%20%20angular(v14)%20%20mongodb%20%20crud%20example-10.png)
- Angular
- Creating An Angular 14 Application
- Install Bootstrap Package
- Add The Bootstrap Menu
Angular:
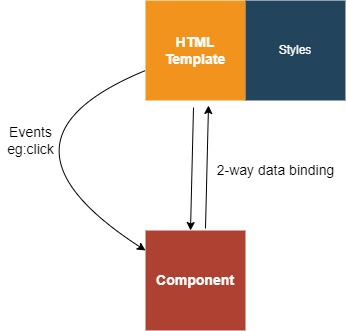
- Angular is a component-based application.
- The angular component comprises 3 files like Typescript File(*.ts), HTML File(*.html), CSS File(*.css).
- Components typescript file and HTML file support 2-way binding which means data transfer takes is bi-directional.
- Component typescript file listens for all HTML elements events from the HTML file.
Create An Angular(v14) Application:
To create angular applications, first, we must have Angular CLI in our local machine. Run the following command to install the Angular CLI
npm install -g @angular/cli
Run the following command to create the angular application
ng new name-of-your-project
While creating an app to add routing say 'yes'.


package.json - contains commands like build, run, test, etc. It also contains packages or library references that our regular application requires.
angular.json - contains the setup and configuration of angular.
angular.json - contains the setup and configuration of angular.
src/index.html - Only the HTML file of the angular application. It contains the root angular component element <app-root></app-root>(default), area for our component to rendered.
src/main.ts - entry file of our angular application to execute.
src/app/app.module.ts - Entity module.
app(folder or root component folder) - contains root component like 'AppComponent' consist of files like 'app.component.ts', 'app.component.html', 'app.component.css'.
Command to run the angular application
ng serve
Install Bootstrap Package:
Let's install bootstrap into our angular application.
npm install bootstrap@5.2.0
Now in 'angular.json' file configure bootstrap 'CSS' and 'JS' files.

Add The Bootstrap Menu:
Let's add the bootstrap menu in 'app.component.html' file.
src/app/app.component.html:
<nav class="navbar navbar-expand-lg  navbar-dark bg-dark">
  <div class="container-fluid">
    <a class="navbar-brand" href="#">Super Heroes</a>
  </div>
</nav>
<router-outlet></router-outlet>
Now run the application and navigate to 'http://localhost:4200'.
Support Me!
Buy Me A Coffee
PayPal Me
Video Session:
Wrapping Up:
Hopefully, I think this article delivered some useful information on NestJS (v9) and Angular(v4). using I love to have your feedback, suggestions, and better techniques in the comment section below.
Refer:
Part-3| NestJS(v9) | Angular(v14) | MongoDB | CRUD Example
Part-4| NestJS(v9) | Angular(v14) | MongoDB | CRUD Example
Part-4| NestJS(v9) | Angular(v14) | MongoDB | CRUD Example
Part-5| NestJS(v9) | Angular(v14) | MongoDB | CRUD Example
Part-6| NestJS(v9) | Angular(v14) | MongoDB | CRUD Example
Part-6| NestJS(v9) | Angular(v14) | MongoDB | CRUD Example
Comments
Post a Comment